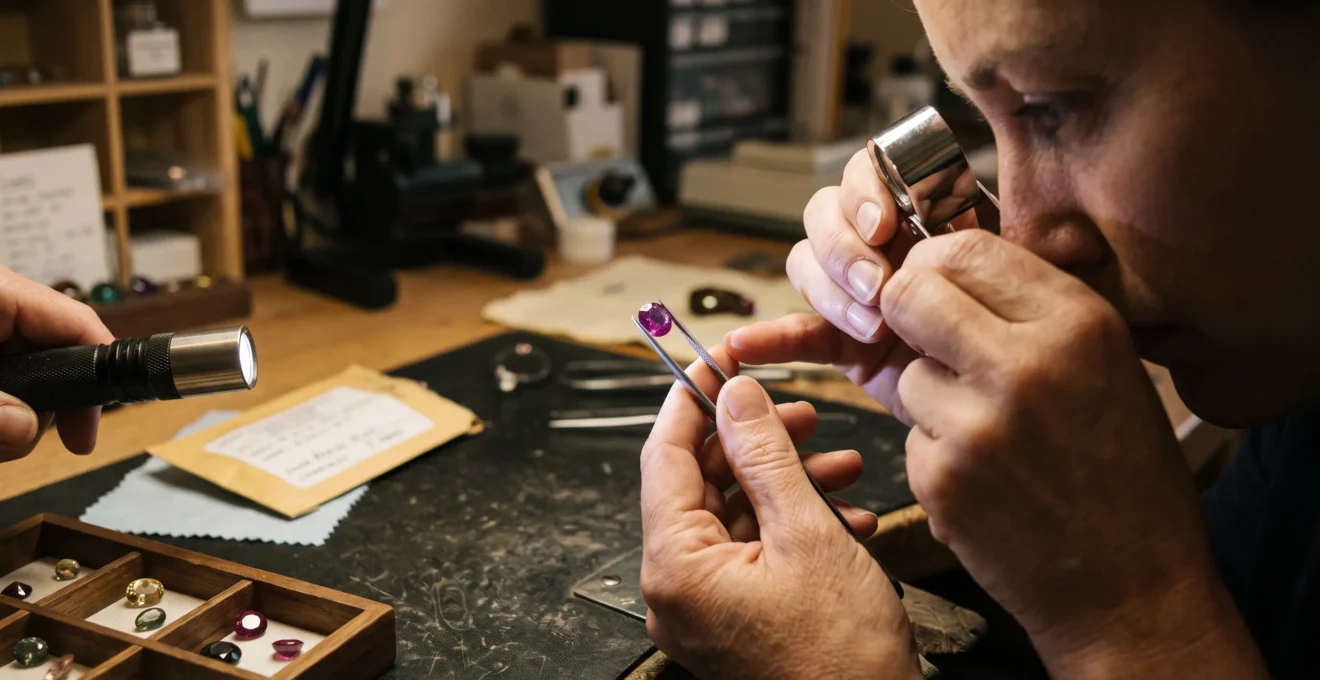
Finding tiny round bubbles inside a gemstone can immediately raise suspicions of glass. That suspicion is reasonable, but bubbles alone cannot establish whether a stone is natural, synthetic or an imitation.
Manufactured glass frequently contains trapped gas bubbles. Certain laboratory-grown crystalline gemstones, particularly flame-fusion synthetic ruby, can contain them too. Natural gemstones may also enclose gas bubbles within fluid inclusions formed during geological processes. Even an apparent bubble seen through a loupe may turn out to be a reflection or a surface mark.
The important questions are therefore not simply whether bubbles are present, but where they occur, what surrounds them and which other properties support their interpretation.
A 10x loupe and a controlled light source can help collectors recognise suspicious patterns without damaging a stone. Those observations can guide a purchase or return decision, although they cannot replace laboratory identification when the evidence remains ambiguous.
Gas bubbles in gemstones: the essential distinctions
- Round bubbles scattered through a stone may indicate manufactured glass, especially when accompanied by flow patterns or independently confirmed glass properties.
- Natural gemstones can contain gas bubbles inside fluid inclusions, while flame-fusion synthetics may show both bubbles and curved growth striae.
- Check apparent bubbles at different depths and lighting angles. If identification affects a valuable purchase, use independent gemological testing rather than magnification alone.
- Why Do Glass Bubbles Look « Round and Random » While Natural Fluid Inclusions Often Don’t?
- How to Check for Bubble Clusters Using a 10x Loupe and One Torch Angle?
- Gas Bubbles vs Negative Crystals: Which One Are You Actually Seeing?
- The Circular-Feature Mistake: Misreading Reflections as Bubbles and Rejecting Real Gems
- When Are « Bubbles » Enough to Walk Away, and When Should You Request a Lab Test?
- How to Reveal Growth Lines Using Darkfield-Style Lighting With a £10 Torch Setup?
- £50 Tool Kit vs £200 Tool Kit: Which Non-Destructive Tools Actually Change Your Accuracy?
- Which Non-Destructive Tests Give You the Most Certainty Before You Lose the Return Window?
Why Do Glass Bubbles Look « Round and Random » While Natural Fluid Inclusions Often Don’t?
Gas bubbles in manufactured glass often look round because a gas pocket within a softened, fluid material tends toward a shape that minimises its surface energy. Natural fluid inclusions develop within a crystal structure, where growth and geological processes can impose angular or irregular outlines. Neither appearance is universal, and distribution matters as much as shape.
As manufactured glass cools and solidifies, gas pockets may become trapped within its body. Surface tension favours rounded bubbles, although flow, deformation and cooling conditions can also produce elongated or flattened cavities.
Because glass lacks the ordered crystal structure of ruby, sapphire or emerald, its gas bubbles are not normally shaped by crystallographic growth faces. They may appear as separate round points, concentrated groups or features associated with flowing material.
Natural crystalline gemstones develop differently. Fluids may become enclosed during crystal growth or enter fractures that later heal. A trapped fluid can contain liquid, gas or multiple phases, and its enclosing cavity may adopt a shape influenced by the host crystal.
According to GIA’s study of inclusions in gemstones, natural fluid inclusions can contain visible gas bubbles and may be associated with crystallographic directions, growth features and healed fractures.
A useful distinction is between the shape of the cavity and the shape of the bubble inside it. An angular natural fluid inclusion may contain a nearly spherical gas bubble. Seeing a round object does not mean the surrounding cavity is round.
Distribution provides a second clue:
- Scattered isolated spheres: compatible with trapped gas in glass, but not exclusive to glass.
- Swirling concentrations: potentially consistent with manufacturing-related flow or growth features, requiring confirmation.
- Fingerprint-like networks: commonly associated with healed fractures and natural fluid-inclusion assemblages, although appearance alone cannot prove origin.
- Angular cavities following crystal directions: compatible with negative crystals or crystallographically influenced fluid inclusions.
Exceptions matter. Natural geological glasses, including tektites, may contain bubbles. Flame-fusion synthetic gemstones can contain rounded gas bubbles despite being crystalline materials rather than manufactured glass imitations.
Neither randomness nor alignment is a definitive test. Some natural inclusions occur without an obvious pattern, and manufactured materials can display organised internal structures.
Once those patterns are understood, controlled illumination helps establish whether the suspected bubbles are genuinely inside the stone.
How to Check for Bubble Clusters Using a 10x Loupe and One Torch Angle?
Clean the gemstone, hold a 10x loupe steady and illuminate the stone from one controlled side angle with a small torch. Move the stone through successive focal depths, looking for rounded features grouped within its interior. Record what you see before changing the lighting angle to confirm the features are not reflections.
A 10x triplet loupe provides a practical starting point because it offers useful magnification while remaining portable. The torch should have a reasonably focused beam that can illuminate the gemstone without shining directly into the observer’s eye.
Begin in subdued ambient light. Place a dark, non-abrasive surface beneath the work area, secure the stone with suitable tweezers or a holder, and avoid exposing it to unnecessary pressure.
- Clean the accessible surfaces. Remove ordinary dust and fingerprints using a cleaning method appropriate to the gemstone and any known treatments. Avoid chemical cleaners, immersion or aggressive wiping when the material is uncertain.
- Establish a fixed lighting angle. Direct the torch from the side at a low angle while keeping its beam out of the loupe.
- Focus on the upper interior. Bring visible internal features into focus rather than concentrating on the polished surface.
- Inspect progressively deeper. Adjust the distance and orientation slightly to examine different internal planes, including areas near the pavilion and culet where accessible.
- Confirm suspicious groups. Note their appearance, depth and distribution, then vary the angle deliberately to distinguish persistent inclusions from optical effects.
Potential gas bubbles may appear as small round dots, sometimes with bright edges and darker centres. That appearance depends on illumination, focus, refractive contrast and the surrounding material. It is not a unique optical signature of manufactured glass.
A genuine internal cluster should remain associated with a particular region of the gemstone as the stone is repositioned. Its apparent location may shift because of refraction, but the features should remain consistent with an internal structure rather than appearing and disappearing like an isolated glare spot.
One initial torch angle creates a useful reference condition. It does not eliminate the need for a second viewing angle when confirming a feature.
Remember that a 10x loupe cannot reliably expose every inclusion. Very small bubbles, deeply coloured material, complicated facet reflections or a closed-back setting can conceal relevant structures.
The next question is whether the internal feature represents a free-looking gas bubble or a cavity shaped by a growing crystal.
Gas Bubbles vs Negative Crystals: Which One Are You Actually Seeing?
A negative crystal is a cavity inside a crystalline gemstone whose outline reflects aspects of the host crystal’s geometry. A gas bubble is a gas-filled portion of an inclusion or cavity and commonly appears rounded. The distinction depends on examining both the cavity boundary and its contents, not merely identifying a circular spot.
Negative crystals can develop angular, geometric outlines resembling miniature crystal forms. Their faces may appear as straight boundaries or faint internal facets when illuminated appropriately.
A natural negative crystal can also contain fluid, with a smaller gas bubble visible inside the angular cavity. This is an important cause of mistaken glass identification: the observer notices the round internal bubble but overlooks the surrounding crystallographic shape.
Compare the principal visual clues:
| Observation | Gas bubble | Negative crystal |
|---|---|---|
| Typical appearance | Rounded or sometimes elongated gas phase | Angular or faceted cavity outline |
| Relationship to crystal structure | Gas-phase shape is not necessarily crystallographic | Cavity can reflect host-crystal geometry |
| Possible distribution | Isolated, clustered or associated with other internal features | May occur along growth-related structures or healed fractures |
| Diagnostic meaning | Can occur in glass, natural fluid inclusions and some synthetics | Suggests crystallographically controlled cavity formation, without proving natural origin |
Focus carefully on the cavity perimeter. If the dark circular feature sits within a larger angular outline, the inclusion may contain both a gas bubble and a negative-crystal-shaped cavity.
Do not assume that finding a negative crystal automatically authenticates the stone. Laboratory-grown crystals can also develop internal cavities and inclusions whose appearance requires specialist interpretation.
The synthetic gemstone exception is especially relevant. GIA’s comparison of natural and laboratory-grown gemstone formation documents gas bubbles and curved growth striae as characteristic inclusions in certain flame-fusion synthetic rubies.
These curved growth lines may occur near rounded or elongated bubbles. Under limited magnification, a curved stria can even resemble part of a bubble outline, while a bubble aligned with a growth feature can make the line harder to recognise.
Bubbles plus convincing curved growth striae therefore suggest a different identification route from bubbles associated with glass-like flow structures. Neither observation should be isolated from the stone’s optical properties.
Even this distinction depends on one prior condition: the observed circle must be a real physical feature rather than an optical reflection.
The Circular-Feature Mistake: Misreading Reflections as Bubbles and Rejecting Real Gems
Not every bright or dark circle seen through a loupe is a gas bubble. Facet reflections, reflected light sources, dust, pits and scratches can create bubble-like shapes. To verify an apparent inclusion, move the gemstone and illumination separately, check whether the feature remains at a consistent internal depth, and inspect the surface for contamination.
Faceted gemstones repeatedly reflect and refract light. A bright spot from a torch can appear through several facets, sometimes creating the impression of a round inclusion positioned deep inside the material.
Likewise, internal reflections can duplicate the appearance of a real inclusion. Seeing what looks like several bubbles does not necessarily establish that several separate cavities exist.
The best practical check is controlled movement. Hold the loupe reasonably steady and make a small adjustment to the gemstone’s orientation. Observe whether the feature remains attached to a reproducible internal position.
Then change the torch angle. A reflection may shift, change shape or disappear altogether. A genuine inclusion may change brightness or apparent position, but its physical relationship with surrounding internal features remains consistent.
There is an important qualification: movement alone is not decisive. Real inclusions can appear to move because of refraction, and reflections can appear stable under certain viewing geometries. Depth focusing and repeated observation are necessary.
Surface contamination presents a separate problem. Dust particles, polishing residues and small surface pits can produce rounded shapes under magnification. Even fine scratches can look like enclosed features when viewed obliquely.
After appropriate cleaning, check whether the suspected bubble comes into sharp focus at the same position as the gemstone’s polished surface. If it does, consider a surface feature before interpreting it as an internal cavity.
The error can be expensive in both directions. A genuine natural gemstone may be wrongly rejected because an optical circle was interpreted as glass evidence. Conversely, a glass imitation may escape proper scrutiny when the buyer treats a confusing visual observation as sufficient confirmation of authenticity.
Record the evidence neutrally: an apparent circular feature, its observed depth, and how it responds to changes in illumination. Avoid labelling it a confirmed gas bubble until its nature is established.
Once optical artefacts have been excluded as far as practical, the remaining evidence must be weighed against the potential cost of getting the identification wrong.
When Are « Bubbles » Enough to Walk Away, and When Should You Request a Lab Test?
Walk away from a purchase when convincing internal bubble patterns conflict with the seller’s claimed identity and other evidence suggests an imitation, especially if independent verification is unavailable. Request professional testing when the features are ambiguous, the gemstone appears otherwise plausible, or its financial or personal importance makes an incorrect conclusion costly.
In dispute work, the question is rarely whether one observation looks suspicious. It is whether the observations collectively justify a particular identification.
Consider the following decision framework:
| Observed evidence | Interpretation | Practical decision |
|---|---|---|
| Numerous convincing internal bubbles with flow-like features and independently verified glass properties | Strong evidence supporting manufactured glass | Reject a sale that represents the material as an incompatible natural gemstone |
| Round features associated with curved growth striae | Potential flame-fusion synthetic material | Seek confirmation of synthesis and verify the seller’s disclosure |
| Possible gas bubbles enclosed within angular cavities or healed-fracture patterns | Compatible with natural fluid inclusions | Continue identification; do not reject solely for the bubbles |
| A few unresolved circular features | Insufficient evidence | Request additional examination or a suitable laboratory report |
| No visible bubbles | No useful exclusion of imitation or synthesis | Use independent identification methods |
Other apparent glass indicators can strengthen suspicion. Flow-like structures, abundant rounded cavities and certain damaged-edge appearances may be relevant, but none is exclusive to glass. Hardness can contribute to professional identification, although scratching a valuable gemstone to test hardness is inappropriate and potentially destructive.
A documented laboratory example illustrates why combined testing matters.
GIA laboratory case: glass presented as emerald-like material
In a Spring 2020 Gems & Gemology laboratory report, a transparent green octagonal step-cut specimen resembling emerald was identified as manufactured glass. Microscopic examination showed rounded gas bubbles within the material and flattened bubbles in fractures.
The specimen had a single refractive index of 1.510, compared with the emerald refractive-index range of 1.577–1.583 cited in the report. Infrared spectroscopy also supported the glass identification. The result applied to that particular specimen, not to every glass imitation. See GIA’s laboratory report on glass imitating emerald.
Testing costs must be weighed against the gemstone’s value and the potential loss. A recognised gemological laboratory, such as GIA, IGI or another appropriately qualified provider, can offer identification services, but the required report type, accepted materials, fees and turnaround must be checked before submission.
For an online purchase, check the return deadline before buying. Request existing identification documentation and clear photographs of the stone and any suspicious inclusions. Do not assume that a laboratory will return the stone before a seller’s deadline.
A high-stakes purchase may justify professional examination before payment. If the seller cannot provide a reasonable opportunity for verification, declining the transaction may be more sensible than accepting an unresolved identification risk.
The next useful observation is whether the internal features include growth lines characteristic of certain synthetic gemstones rather than manufactured glass.
How to Reveal Growth Lines Using Darkfield-Style Lighting With a £10 Torch Setup?
A focused torch, a simple cardboard light baffle and a dark working surface can approximate the lighting geometry used in darkfield gemstone examination. By directing light into the gemstone from the side while preventing direct glare, this arrangement may reveal internal growth features, including curved striae associated with some flame-fusion synthetic gemstones.
Professional darkfield illumination makes internal inclusions appear bright against a relatively dark background. The principle is to introduce light into the material while keeping direct illumination away from the viewing optics.
GIA‘s description of professional gemstone analysis procedures explains how darkfield, brightfield, reflected and polarised lighting reveal different features. A household torch arrangement applies a similar side-lighting principle, but it does not reproduce the optical control or performance of a professional gemological microscope.
The simplest low-cost arrangement uses a focused-beam torch with an illustrative budget of £10, a piece of dark card or a short tube to block stray light, and a stable dark surface.
- Place the dark surface beneath the gemstone and reduce unnecessary room lighting.
- Hold the gemstone securely with appropriate tweezers or a stone holder.
- Position the torch approximately perpendicular to the viewing direction so that light enters from the side.
- Use the card or tube to prevent the torch beam from shining directly into the loupe.
- Adjust the stone gently through small viewing angles while inspecting the interior for curved or parallel growth-related features.
Curved growth striae may appear as faint, sweeping internal lines, occasionally visible beside rounded gas bubbles. In appropriate corundum or spinel specimens, convincing curved growth features can support identification of flame-fusion synthesis.
Curvature alone must be interpreted carefully. Facet reflections, colour zoning and other internal structures may create curved-looking patterns that require closer investigation. A convincing diagnosis relies on determining that the observed lines are genuine growth features.
Strong body colour, overlapping inclusions and optical dispersion can obscure subtle striae. Their absence also cannot exclude synthetic origin: flux-grown and hydrothermal synthetic materials do not necessarily display the curved striae characteristic of flame fusion.
Consequently, darkfield-style lighting complements the bubble inspection rather than replacing it. The objective is to identify additional evidence that distinguishes possible synthetic crystal growth from the internal structure of glass.
For collectors considering more equipment, the next investment should address an unanswered identification question, not merely provide brighter illumination.
£50 Tool Kit vs £200 Tool Kit: Which Non-Destructive Tools Actually Change Your Accuracy?
A £50 budget is best directed towards clear magnification, controllable lighting and careful observation. A £200 budget may support additional instruments, but greater spending does not automatically improve identification accuracy. Refractive-index measurements, optical-behaviour testing and other physical properties can provide evidence that a loupe cannot, provided the instruments are suitable and correctly used.
These figures are illustrative equipment budgets, not verified market prices or guarantees that particular tools are available at those amounts.
Start with the question each instrument can answer. Magnification reveals what an inclusion looks like; a refractometer investigates optical properties; a polariscope examines polarisation behaviour. Those are different kinds of evidence rather than interchangeable levels of magnification.
| Instrument | Question it helps answer | Role in the bubble decision |
|---|---|---|
| 10x triplet loupe | Are there visible internal inclusions, surface marks or growth features? | Primary inspection tool in either budget |
| Focused torch | How do features respond to controlled illumination? | Helps distinguish internal structures and reflections |
| Refractometer | What is the gemstone’s refractive index, where measurement is feasible? | Provides independent material-identification evidence |
| Polariscope | How does the stone behave under crossed polarised light? | Helps investigate optical character, with interpretive limitations |
| UV lamp | Does the material fluoresce under ultraviolet excitation? | Supplies supplementary evidence, rarely a standalone answer |
| Hydrostatic weighing setup | What is the specimen’s specific gravity? | Can help narrow material possibilities when measurement is appropriate |
The inexpensive loupe-and-torch combination is often sufficient to establish whether further investigation is justified. It is not sufficient to authenticate an otherwise unidentified gemstone.
A refractometer can materially strengthen the analysis when a reliable measurement distinguishes the claimed gem species from its possible imitations. However, conventional contact refractometry requires an accessible suitable surface and appropriate technique, and it has measurement limitations.
A polariscope provides another type of information, especially when assessing optical behaviour in crystalline versus non-crystalline materials. Interpretation can be complicated by anomalous optical effects, strain or difficult viewing conditions.
UV fluorescence can add useful observations but depends on the material, trace constituents and treatments. Specific gravity can also help narrow identification, although suitable loose specimens and careful measurements are needed. Neither test automatically establishes natural origin.
Technique matters more than a nominal price comparison. A well-focused inspection using an ordinary torch may reveal more than an uncontrolled examination with expensive illumination. Practising on reference stones of reliably established identity is especially useful for learning how real inclusions differ from reflections.
The sensible purchasing sequence is therefore to master loupe inspection and illumination first, then add instruments only when they address a recurring diagnostic uncertainty.
The decisive issue for a recent purchase is not the size of the toolkit but whether the available evidence can be gathered and interpreted before the return deadline expires.
Key takeaways before making a purchase decision
- Separate observations from conclusions: a photographed round feature is evidence of an appearance, not yet a confirmed glass inclusion.
- Prioritise a material-identifying measurement over additional ambiguous visual clues whenever reliable equipment or professional testing is available.
- Protect the right to return the item before committing to an investigation that may take longer than the seller permits.
Which Non-Destructive Tests Give You the Most Certainty Before You Lose the Return Window?
Begin with a documented loupe examination, then use controlled lighting to investigate bubbles and growth features. If the stone remains unidentified, prioritise suitable independent optical or physical tests and professional assessment. The most useful test is the one that can resolve the specific uncertainty before the return deadline, not necessarily the most sophisticated instrument available.
There is no universally valid ranking of gemstone tests by accuracy per unit of time or cost. Their value depends on the claimed material, competing identifications, specimen condition and operator competence.
For an unfamiliar coloured gemstone, however, a practical sequence begins with inexpensive observations and progresses towards tests that provide independent physical information.
- Initial visual inspection: document surface condition, visible inclusions, colour distribution and apparent growth patterns.
- Controlled illumination: verify the location and behaviour of suspected bubbles, fractures or curved striae.
- Refractive-index examination: obtain a reliable measurement when the stone and equipment permit it, then compare it with relevant identification possibilities.
- Additional optical and physical tests: use a polariscope, UV observation or specific-gravity measurement where each can answer a material-specific question.
- Professional laboratory assessment: seek appropriate identification when the remaining uncertainty cannot be resolved reliably within the buyer’s available time and resources.
A refractive-index result that clearly contradicts the claimed gem species may carry substantially more identification value than several weak visual impressions. Conversely, a refractive-index result compatible with a material does not necessarily establish its natural origin or treatment status.
Evidence should therefore be weighed according to specificity, reliability and consistency. Counting three ambiguous clues as though they outweigh one properly obtained diagnostic measurement is not a sound approach.
Five actions to complete before your return deadline
- Confirm the return conditions. Save the seller’s policy, the transaction date and the applicable deadline in one evidence file.
- Document the specimen. Take clear photographs of the gemstone, its packaging and any supplied identification documents; retain the original image files.
- Record the loupe findings. Produce a short inspection note describing apparent bubbles, their locations, surrounding features and any unresolved reflections.
- Identify the next decisive test. Write down the claimed material, the principal alternative identification and which independent measurement could help distinguish them.
- Resolve the timing decision. Obtain laboratory submission requirements and an applicable turnaround indication, or document the decision to return the stone if verification cannot reasonably occur before the deadline.
These steps are a practical consumer workflow, not a laboratory-validated identification protocol. Their purpose is to preserve evidence and prevent a missed return deadline while the gemstone’s identity remains uncertain.
Where the laboratory turnaround exceeds the remaining return period, request a written extension or other acceptable arrangement from the seller. Do not assume that submitting the stone for analysis pauses the contractual return deadline.
Keep the seller’s description, photographs, certificate or report references and correspondence together. Such records can help clarify what was represented at purchase and which observations subsequently raised doubts.
Professional analysis may still be necessary even after several apparently consistent home tests. Gemstone identification can involve microscopic examination, optical measurements and advanced analytical methods, particularly where treatments or sophisticated synthetic materials are involved.
Gas bubbles do not always mean glass. They become persuasive evidence for manufactured glass only when their appearance and accompanying diagnostic properties support that identification. Natural fluid inclusions and flame-fusion synthetics remain important exceptions, while reflections can create apparent bubbles that do not exist. Before accepting or rejecting a valuable stone, preserve the available evidence, verify its identity through appropriate independent testing and act within the return window.
Can a real emerald contain a gas bubble?
Yes. Natural emerald can contain fluid inclusions with a visible gas phase. Such inclusions may have angular outlines or occur within healed-fracture structures. A gas bubble is therefore not sufficient evidence that an emerald-like stone is glass, although its overall inclusion pattern and physical properties still require examination.
Can synthetic ruby contain gas bubbles without being glass?
Yes. Flame-fusion synthetic ruby is crystalline corundum, not manufactured glass, and it may contain gas bubbles. Curved growth striae associated with those bubbles can provide additional evidence of flame-fusion synthesis. Not every synthetic ruby displays these features.
Can a natural gemstone have a perfectly round bubble?
Yes. A rounded gas phase may be present inside a natural fluid inclusion, even when the surrounding cavity has an angular or irregular shape. Roundness alone cannot establish whether a gemstone is natural, synthetic or manufactured glass.
Can resin or a glass-filled gemstone also show bubbles?
Gas bubbles may occur in polymer materials such as resin and in filling materials introduced into gemstone cavities or fractures. Their significance depends on whether they belong to the stone’s host material or a separate substance. Magnification alone may not be sufficient to identify a filler or distinguish a composite specimen from a solid gemstone.
Does a gemstone with no visible bubbles have a better chance of being natural?
The absence of visible bubbles provides little assurance of natural origin. Manufactured glass may contain no detectable bubbles, many synthetic gemstones lack obvious gas inclusions, and some internal features are beyond the resolving capability of a 10x loupe. Independent identification remains necessary when authenticity matters.